Powerful visuals have the potential to elevate any online experience, whether you’re managing a personal blog or running a professional shop. Images capture attention, highlight key points, and break up large chunks of text—making your site’s content more engaging overall.
Fortunately, WordPress offers extensive built-in features for organizing and displaying your images. By learning about the different size options and optimizing them effectively, you’ll keep your site both attractive and high-performing.
In this article, we’ll walk through the default WordPress image sizes, explain how to customize them, and cover additional techniques such as cropping and adding new sizes. Let’s dive in!
Understanding WordPress Image Sizes
WordPress image sizes refer to the different dimensions and resolutions of images that are used on a website. These sizes are crucial for maintaining the visual appeal and functionality of your site. By understanding how WordPress processes images and the various image sizes available, you can effectively optimize your website’s performance and enhance the user experience.
When you upload an image to WordPress, the platform automatically generates several versions of that image in different sizes. This is done to ensure that your images display correctly across various devices and screen sizes. The default sizes include thumbnail, medium, large, and full size, each serving a specific purpose.
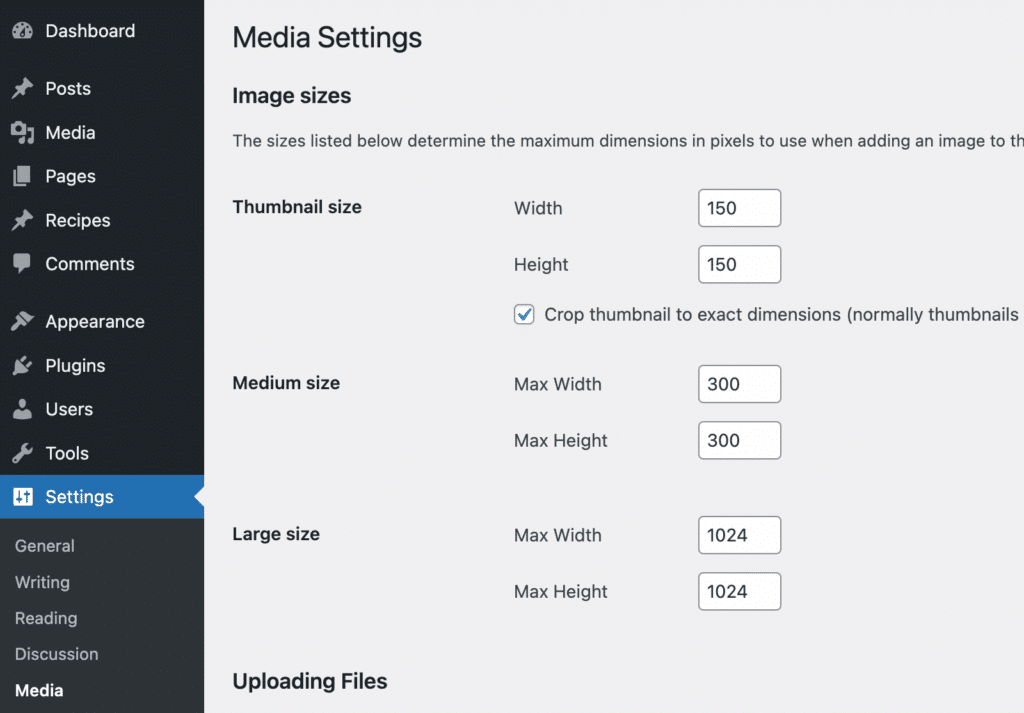
Thumbnail Size: Typically 150×150 pixels, this size is perfect for displaying small previews of images, such as in galleries or featured post thumbnails.
Medium Size: With a maximum of 300×300 pixels, medium-sized images are ideal for content that requires a bit more detail without overwhelming the page layout.
Large Size: Capped at 1024×1024 pixels, large images are suitable for showcasing high-quality visuals, such as hero images or detailed illustrations.
Full Size: This retains the original dimensions of the uploaded image, making it ideal for situations where image quality is paramount.

Understanding these default WordPress image sizes allows you to make informed decisions about which size to use in different parts of your site. Additionally, knowing how to customize these sizes can further tailor your site’s appearance and functionality to better meet your needs.
Optimizing images by choosing the right size enhances your site’s visual quality and improves loading times and overall performance. By leveraging WordPress’s built-in image processing capabilities, you can ensure that your website remains attractive and efficient, providing a seamless experience for your visitors. Addressing challenges related to images size and optimizing WordPress image size for different uses, such as theme requirements and social media sharing, is essential for achieving a balance between quality and performance.
How WordPress Processes Images
When you upload an image to WordPress, the platform automatically processes and resizes it to create multiple versions. These versions include the original image, a thumbnail, a medium-sized image, and a large image. This resizing ensures that your images display correctly across various devices and screen sizes, enhancing both aesthetics and functionality.
Optimizing image file sizes is crucial to enhance website speed and user experience. Uploading images that are too large can negatively impact loading times, so it’s important to adjust default image settings to maintain optimal performance.
WordPress employs a combination of algorithms and image processing techniques to resize images. This process involves reducing the image’s resolution and file size while maintaining its quality. The resulting images are then stored in the WordPress media library, making them easily accessible for use throughout your website.
Image Resolution and DPI
Image resolution and DPI (dots per inch) are crucial factors that affect the quality and size of an image. Image resolution refers to the number of pixels in an image, while DPI indicates the number of dots per inch that an image is printed at.
For web images, a resolution of 72 DPI is generally sufficient, providing a good balance between image quality and file size. However, if you plan to print your images, a higher DPI of 300 is recommended to ensure clarity and high-quality prints. Understanding these concepts helps you choose the right settings for your images, whether they are for online display or print.
How to Upload Images in WordPress
If you’re new to WordPress, uploading images is straightforward. You can do this by adding an Image block in the Block Editor (the plus sign + in any post or page) and selecting Upload to bring files from your computer. Alternatively, you can pick Select Image to insert an existing file from your Media Library. WordPress automatically generates various sizes for uploaded images, and customizing these sizes is important for improving website aesthetics and loading times.
You can also navigate directly to Media > Add New in your WordPress dashboard to bulk-upload multiple images. Every file you add ends up in your Media Library, keeping all your visuals in one central location.
For better organization, give your images descriptive names and add short descriptions. This not only helps you find them later but also boosts accessibility and SEO. If you run into any upload issues, WordPress provides handy troubleshooting steps to fix common errors.
How to Use the Default WordPress Image Sizes
To accommodate various use cases, WordPress automatically generates a few default image sizes every time you upload a file:
Thumbnail: 150px square
Medium: Up to 300px in width and height
Large: Up to 1024px in width and height
Full Size: Keeps the original dimensions
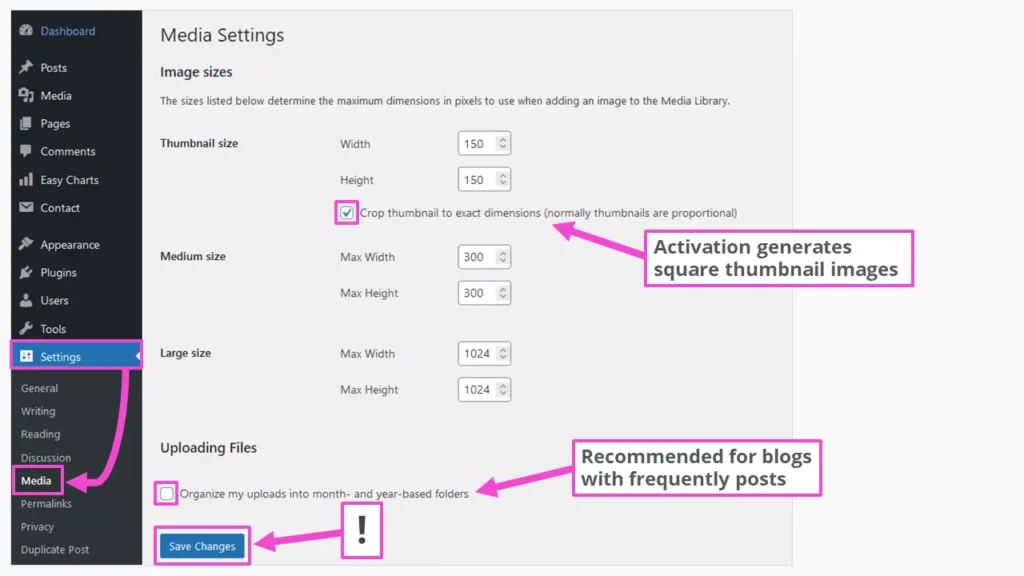
Customizing the default size can help better fit specific needs, streamlining the image management process and improving visual consistency across different site sections.
When inserting an image into a page or post, you can choose between these preset sizes in the Image size dropdown. Some themes may offer extra options, but these four are standard across WordPress installations. Adjusting these default sizes or adding custom sizes can significantly enhance website optimization and performance.
Thumbnails
Thumbnails often appear in blog feeds or post lists. Their compact size also makes them perfect for gallery layouts.
Medium
Medium-sized images are great for adding visual elements that aren’t too large—especially if you want to keep your site lightweight and fast.
Large and Full Size
If you have a hero image or detailed illustration to showcase, Large or Full Size might be best. Full Size keeps the image exactly as uploaded, while Large is maxed at 1024px—helpful for controlling file size. Resizing large images is crucial to improve website loading times and optimize performance.
Choosing the Right Image Format
Selecting the right image format is essential for optimizing your website’s performance and user experience. Different image formats offer various advantages and disadvantages, and choosing the right one can significantly impact your website’s loading time and image quality.
Image Formats for WordPress
WordPress supports several image formats, each with its own strengths and weaknesses. Here’s a quick overview to help you decide which format to use:
JPEG (Joint Photographic Experts Group): This is a popular format for photographs and images with many colors. JPEG uses lossy compression, which reduces file size but can affect image quality. It’s ideal for photos and complex images where file size is a concern.
PNG (Portable Network Graphics): PNG supports transparency and is perfect for graphics, logos, and icons. It uses lossless compression, preserving image quality but resulting in larger file sizes. Use PNG for images where quality and transparency are important.
GIF (Graphics Interchange Format): GIF supports animation and is suitable for simple graphics and icons with a limited color palette. It uses lossless compression, making it ideal for small, animated images.
BMP (Bitmap): BMP is not commonly used on the web due to its large file size and limited compression capabilities. It’s generally best to avoid BMP for web use.
When choosing an image format for your WordPress website, consider the type of image, its intended use, and the desired balance between image quality and file size. This will help you optimize your site’s performance while ensuring your visuals look their best.
Cropping Your Images in WordPress
Sometimes, even with predefined sizes, you need specific cropping. Instead of using external software, you can fine-tune images inside WordPress. Additionally, adding custom image sizes by editing the functions.php file can help overcome the limitations of default image options, providing better customization and functionality in WordPress themes.
Cropping in the Block Editor
Insert or select an image.
Click on the Crop button.
Drag the corners of the cropping overlay to set the area you want.
Fine-tune aspect ratios by clicking the relevant icon.
Check Image Dimensions in your side panel to enter exact values if needed.
Cropping in the Media Library
Go to Media in the dashboard.
Pick the desired file and click on Edit.
Choose Edit Image.
Drag the cropping frame to highlight the portion you want.
Click Done to save.
Be cautious: this overwrites your original image in the Media Library. If you crop images often, consider adjusting your default dimensions to cut down on repetitive tasks.
How to Adjust the Default Image Sizes
Each WordPress site automatically creates different image versions for distinct purposes—like thumbnails for blog previews or large sizes for banners. But these defaults might not work for everyone. Adjusting the default image size can help better fit specific needs. Setting a new custom image size can address specific needs, but remember that you will need to regenerate thumbnails to apply the changes.
Adding custom sizes to the theme’s functions.php file can provide more flexible image options.
Changing Default Dimensions
Go to Settings > Media.
Under Image sizes, set new widths and heights for Thumbnail, Medium, and Large.
Click Save Changes.
From here on, WordPress will generate images based on your updated settings every time you upload a file.
How to Add More Image Sizes
If your site relies heavily on visuals—for instance, a photography portfolio—you may want to introduce custom image sizes beyond the defaults. Adding and managing new custom image sizes in WordPress involves displaying these sizes in themes and utilizing plugins to create and adjust image dimensions. However, be cautious about the number of image sizes used, as excessive custom sizes can impact server storage and site performance.
Using a Plugin
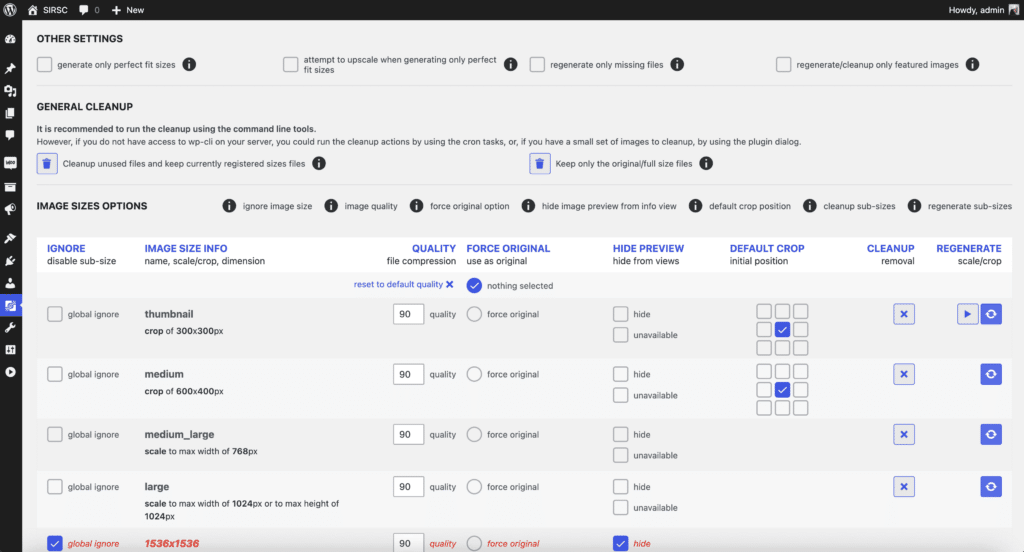
The Image Regenerate & Select Crop plugin can help you do just that. Once installed:
Go to Image Regenerate & Select Crop > Additional Sizes.
Name your new size.
Specify width and height limits.
Decide whether or not you want WordPress to crop images to these exact dimensions.
Click Save Changes.
Avoid going overboard: each new size uses storage and resources, so remove unused sizes by erasing them in Settings > Media.
The Perfect Featured Image Size
A common question is how large (or small) featured images should be. There’s no universal standard, as it often depends on your theme and where you share your content. Here are popular suggestions:
1920×1080: Great for big, bold visuals.
1200×630: A favorite when posting to Facebook.
1024×512: Often suits Twitter posts.
Regardless of the dimension, keep the focal point centered because platforms tend to crop edges. This ensures the critical part of your image remains visible. Additionally, choosing larger images for visual appeal in posts can create a more engaging user experience.
In Summary: Image Sizes in WordPress
WordPress makes it remarkably simple to work with images—thanks to automatic resizing, straightforward cropping tools, and custom sizing options. By learning the basics of uploading and fine-tuning images, you can keep your site looking polished while maintaining optimal performance.
If you need more tailored options, using plugins like Image Regenerate & Select Crop lets you create and manage unique sizes. Just remember: each extra size requires storage and processing resources. Prune what you don’t need, and stick to best practices for efficient loading.
Experiment to find the perfect balance for your theme and audience, and remember that well-placed, properly optimized images will always help your website stand out.
Frequently Asked Questions (FAQ)
What size should images be in WordPress?
Optimal image sizes in WordPress depend on their purpose. Thumbnails are typically 150×150 pixels, medium images up to 300×300 pixels, and large images up to 1024×1024 pixels. Featured images and full-size images should be tailored to your theme and specific needs.
What is the best image format for WordPress?
The best image format for WordPress depends on the image type. JPEG is ideal for photos due to its balance of quality and file size. PNG is best for images requiring transparency, like logos. GIFs are suitable for simple animations.
How do I add additional image sizes in WordPress?
To add custom image sizes, you can use a plugin like “Image Regenerate & Select Crop” or modify your theme’s functions.php file using the add_image_size function. This allows you to specify custom dimensions and cropping options.
How to fix properly size images in WordPress?
Ensure your images match the dimensions specified in your theme or media settings. You can use image editing tools to resize before uploading, or adjust settings in WordPress under Settings > Media and regenerate thumbnails if necessary.
How to add image size attribute in WordPress?
To add image size attributes, you can modify the HTML output of your images. This can be done by editing your theme files or using a plugin that allows you to customize image attributes.
How do I force an image to size in WordPress?
You can force an image size by specifying the dimensions in your theme’s CSS or by using plugins that allow image manipulation. Ensure the image is properly resized to avoid distortion.
What is the add_image_size function?
The add_image_size function in WordPress allows you to define additional image sizes. You can specify width, height, and crop options, enabling greater flexibility in how images are displayed across your site.
What is the synonym word for image?
Common synonyms for “image” include picture, photo, illustration, and graphic. These terms can be used interchangeably depending on the context.
What does having an image mean?
Having an image generally refers to possessing a visual representation or picture. In digital terms, it often means storing or displaying a visual file on a device or platform.
What words can I use instead of image?
Instead of “image,” you can use terms like picture, photo, graphic, illustration, or visual, depending on the context and the type of image being described.
